Caution
This document is an English translation of the “freee Accessibility Guidelines.” The normative version of this document is in Japanese, and the English version is informational. The English translation is incomplete, and any links with their link texts left in Japanese are untranslated. Please be aware that there may be inaccuracies in the translation or parts that are outdated.
How to Perform Checks With NVDA
This section details the initial configuration and basic instructions for using NVDA, a screen reader designed for Windows.
Note that within this guide, notations like NVDA+N indicate pressing the “NVDA control key”, which is explained in Settings Required at First Launch, simultaneously with N.
Environment for Accessibility Checks
At freee, for checks that need to be conducted using a screen reader, we have decided to perform them on the latest versions of NVDA and Google Chrome on Windows.
The reason for choosing Windows over macOS is that it can be assumed that the majority of visually impaired users utilizing screen readers in Japan are using Windows. [1] The adoption of NVDA is because it is considered to be the screen reader with the most advanced support for the latest Web technologies, such as WAI-ARIA. Google Chrome is chosen because, at freee, the latest version of Google Chrome is recommended as the preferred environment.
While it is ideal to create something that works flawlessly in various environments, for these reasons, at freee, we aim to at least achieve seamless functionality with NVDA.
Preparation
- Reference Video
Installation of NVDA
Follow the steps below to install the latest version of the Japanese edition of NVDA. After the installation is complete, NVDA will automatically start. When NVDA is running, various behaviors will be different from usual, so it is recommended to check the method to exit NVDA mentioned later in advance.
Download the latest release of the Japanese edition of NVDA from the NVDA Japanese team’s site (visiting https://i.nvda.jp/ will automatically start the download).
Run the downloaded file (be aware that it will make a sound upon running).
After reviewing the license agreement, check “Agree.”
Click on “Install NVDA on this computer.”
Uncheck “Use NVDA on the logon screen.”
Click “Continue.”
Allow the installation in the Windows User Account Control confirmation dialog.
Once the installation is complete, click “OK.”
Settings Required at First Launch
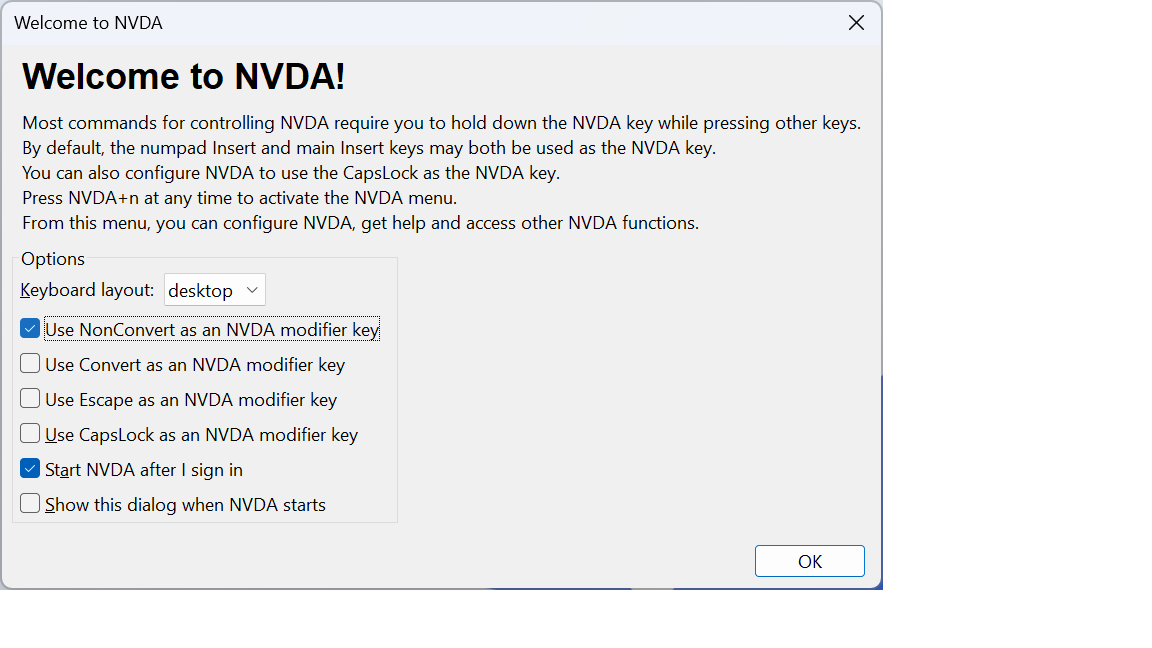
Upon the first launch of NVDA, a “Welcome dialog” will be displayed.
It is advisable to make the necessary settings following the guidance below. If you wish to display this screen again after installation, click on in the NVDA menu as mentioned later.
Keyboard Layout
You should typically select “Desktop.”
The “Laptop” setting provides a default keymap that is useful for keyboards lacking a numeric keypad. However, in most standard checks, the functions assigned to the numeric keypad are rarely needed, so either option is generally acceptable. Nonetheless, considering that most online resources and guides are written with the desktop layout in mind, it is advisable to keep the setting on “Desktop” for consistency.
NVDA Control Key
The NVDA control key is a key used to execute NVDA functions in combination with other keys, and by default, it is assigned to the Insert (Ins) key. However, some laptops and other devices may not have an Ins key, and to accommodate such environments, it is possible to configure another key to serve as the NVDA control key.
If there is a numeric keypad, you can use the 0 key with NumLock turned off, so no specific settings are required on the welcome dialog.
In cases where there is no numeric keypad or no Ins key, it is advisable to configure either the Conversion or Non-conversion keys, or both, to act as the NVDA control key. Depending on the language and the keyboard layout settings of Windows, Caps Lock may be used as the NVDA control key.
The option to use the Esc key is intended for environments lacking any of the aforementioned keys, specifically useful for scenarios like using NVDA within a virtual Windows environment on macOS.
For the purposes of this article, the NVDA control key will be referred to as NVDA. For example, the notation NVDA+N means to press the N key while holding down the NVDA control key set here.
Other Settings
If you only use NVDA for accessibility checks, uncheck “Start NVDA after I sign in.”
The settings on this screen needs to be changed seldom in the future, and it is possible to modify them from the Settings screen, so it is advisable to uncheck “Show this dialog when NVDA starts.”
Other Initial Settings
NVDA has many more settings available beyond those configurable via the welcome dialog, within its settings screen. Here, we’ll discuss settings that are particularly useful when using NVDA for accessibility checks.
The settings screen can be accessed by clicking on the NVDA icon in the system tray at the bottom right of the screen. This menu can also be displayed by pressing NVDA+N.
In the “Settings” screen, setting categories are displayed on the left side, and the settings for the selected category are shown on the right side.
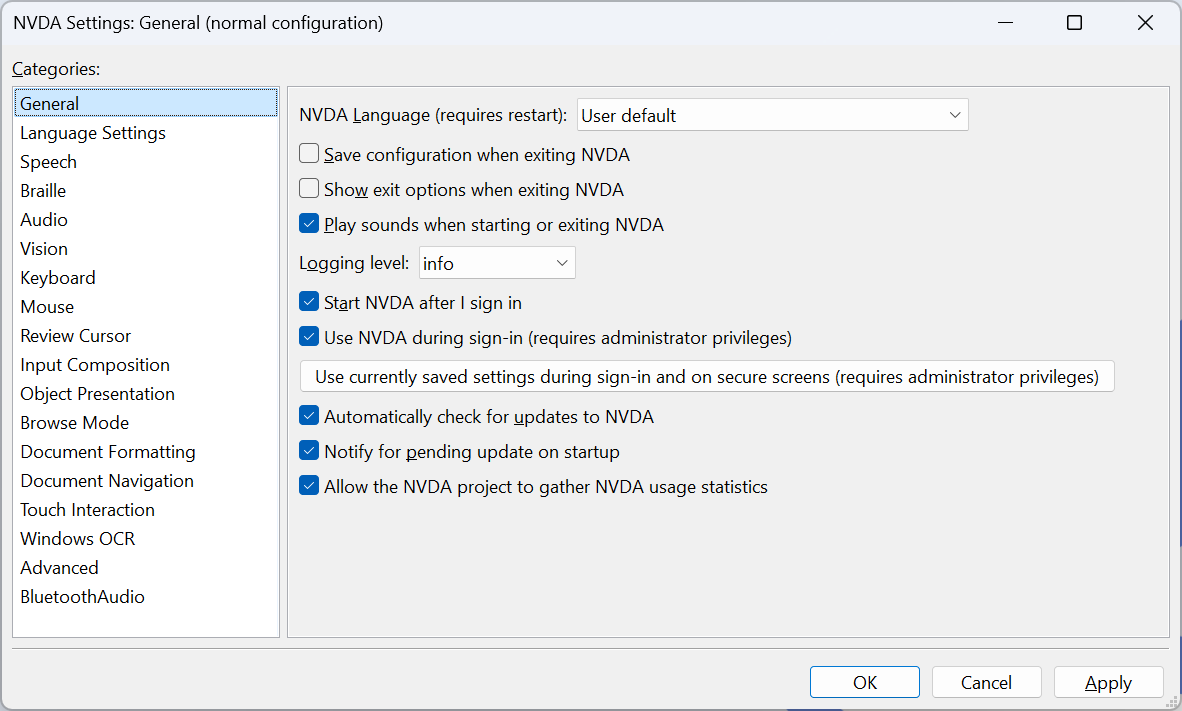
Below, we describe recommended initial settings for some of the categories.
Speech
- Reference Video
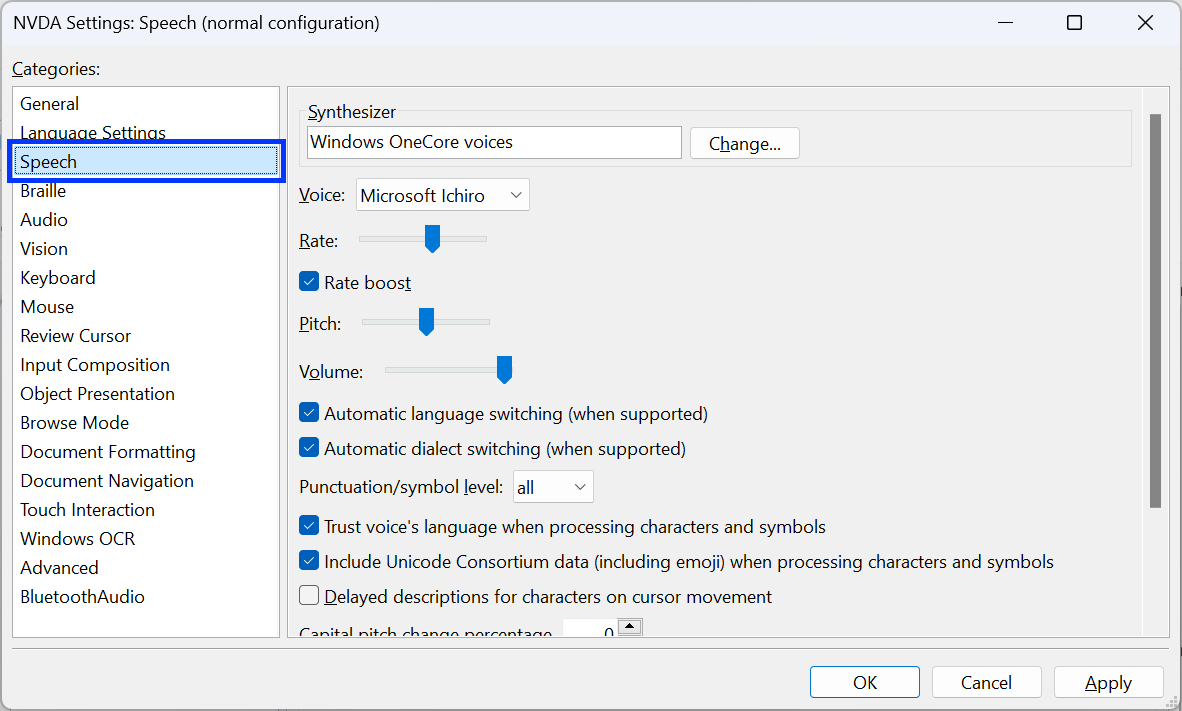
Confirm that the “Synthesizer” is set to “Windows OneCore voices.”
Adjust the “Rate” and “Pitch” according to your preferences. If you become accustomed to fast speech and feel that the “Rate” is too slow even at its maximum, you might want to check “Rate boost” and then adjust the “Rate” to find a comfortable speed.
As mentioned later, there are shortcut keys that allow you to change the speech rate and pitch without having to open this settings screen.
The two options, “Automaticlanguage switching (when supported)” and “Automatic dialect switching (when supported),” relate to the reading of languages other than Japanese. Checking these options makes it easier to perform checks like Check ID: 0621 and Check ID: 0921, which verify whether the language used on Web pages is appropriately specified. Note that to use this setting, a speech synthesis engine for languages other than Japanese must be installed on Windows (see Managing Voice Synthesizers).
Vision
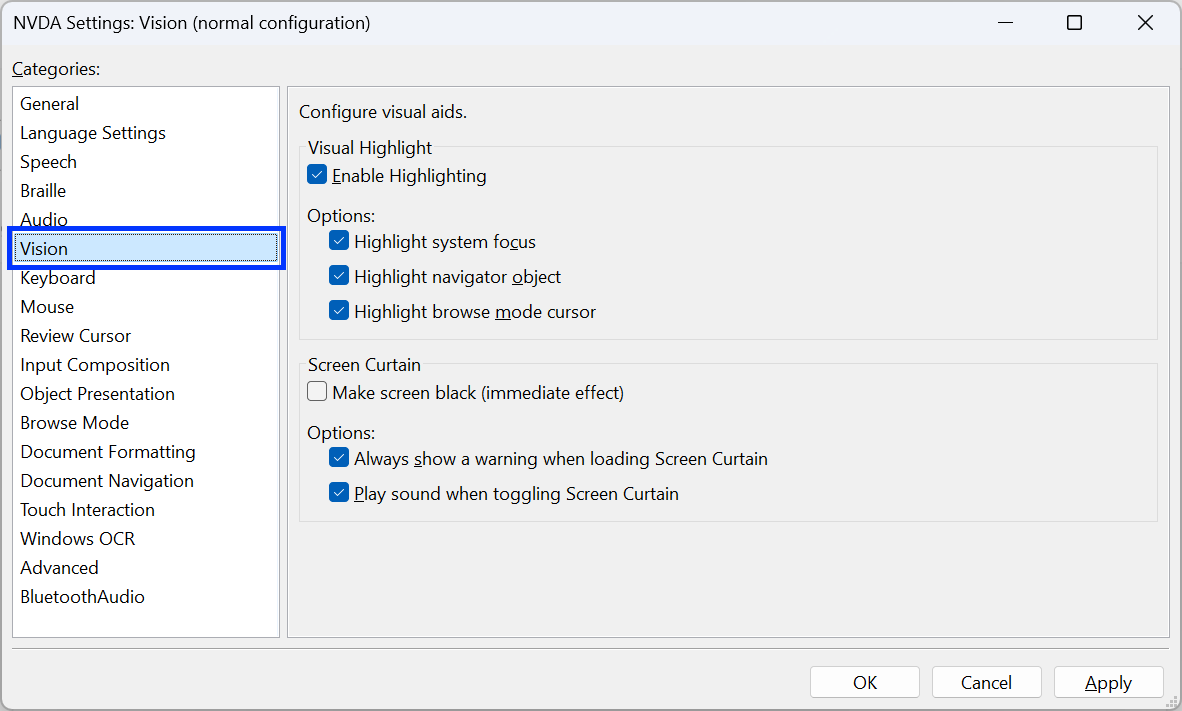
Check “Enable Highlighting,” “Highlight system focus,” “Highlight navigator object,” and “Highlight browse mode cursor.” By checking these options, you can visualize the location currently being read aloud.
Browse Mode

Uncheck “Use screen layout (when supported).” When this option is checked, during browse mode, a whole line of text on the screen is read aloud together. If part of this text is a link, both the linked and non-linked parts are read together, which can make it difficult to distinguish link text during checks. Note that this setting can also be changed with NVDA+V.
Uncheck both “Automatic focus mode for focus changes” and “Automatic focus mode for caret movement.” When these options are checked, it can lead to confusion because NVDA may automatically switch to focus mode depending on your actions in browse mode.
Uncheck “Audio indication for focus and browse modes.” When this option is checked, switching between focus mode and browse mode is notified by a sound effect, but if unchecked, it is announced by voice, which can make it easier for users unfamiliar with the modes to be aware of the mode changes.
Mouse
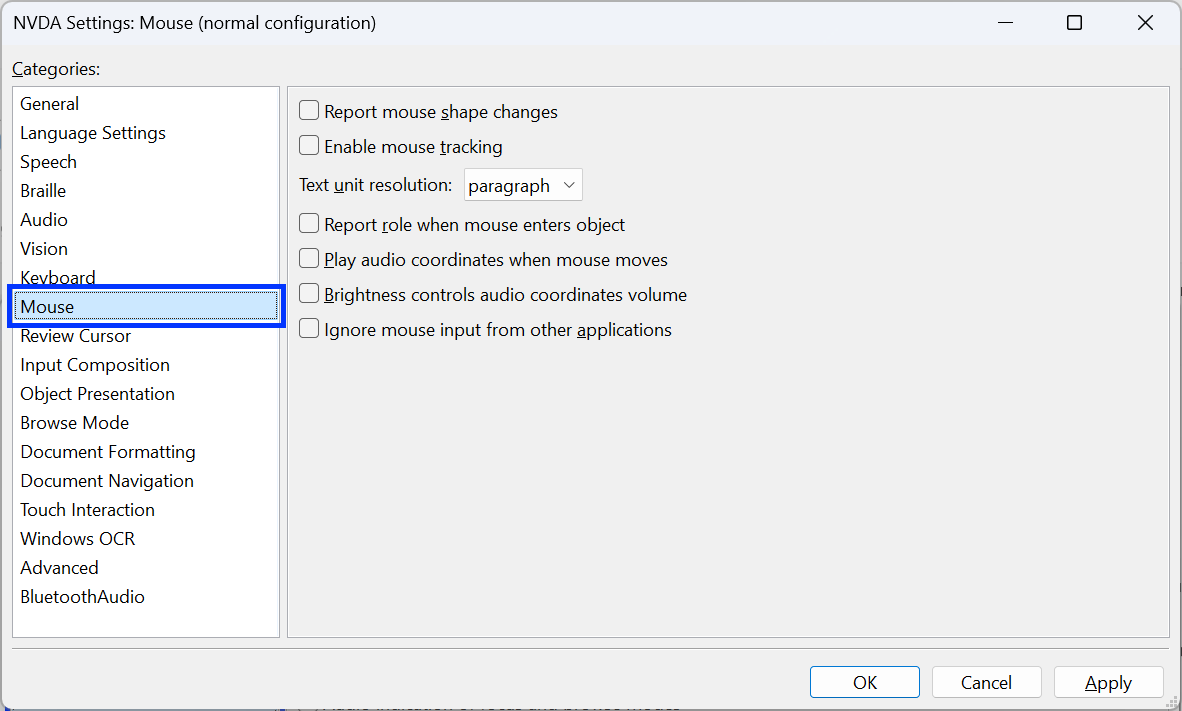
Uncheck “Enable mouse tracking.”
For visually impaired users who cannot see the screen, using a mouse is challenging, so it is preferable to perform accessibility checks without relying on the mouse as much as possible. When this option is checked, text located under the mouse pointer is automatically read aloud. Consequently, text that would not be read aloud through keyboard-only operations may be read aloud due to inadvertent mouse movements, potentially leading to incorrect assessments during the checks.
Document Formatting
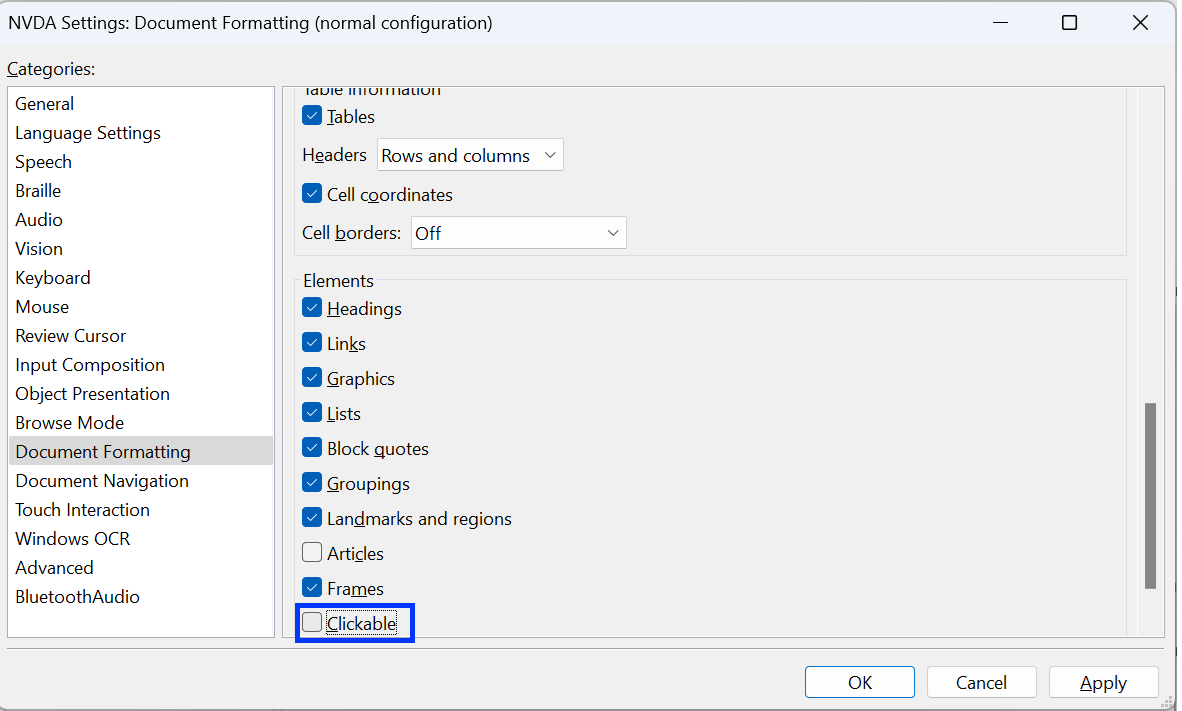
Uncheck “Clickable.”
When this option is checked, elements that are not links or buttons but have an onclick attribute or are otherwise designed to perform some action when clicked, will be announced with “clickable” added to their description.
Ideally, elements that are intended to be clickable should be assigned appropriate roles such as buttons or links.
However, in reality, there are many instances of suboptimal accessibility implementations, such as using span or div elements without specifying a proper role attribute.
While having information about such elements being clickable can be beneficial for users with visual impairments, it becomes unnecessary if the elements are implemented correctly.
During accessibility checks, having this information read aloud can lead to overlooking issues with elements that are not implemented correctly.
Managing Voice Synthesizers
- Reference Video
To operate NVDA with the settings related to natural languages mentioned in Speech, Windows must have speech synthesis engines (voice packages) for multiple languages installed. Here, we describe how to check the voice packages currently installed and how to add new voice packages.
Open the Settings screen from the Start button or similar.
Click on “Time & Language” and then “Speech.”
At the bottom of this screen, check the list of currently installed voice packages in the dropdown menu under “Installed voice packages.”
If only one language is installed, click on “Add voices” and add another language such as “English (United States),” and “Japanese.”
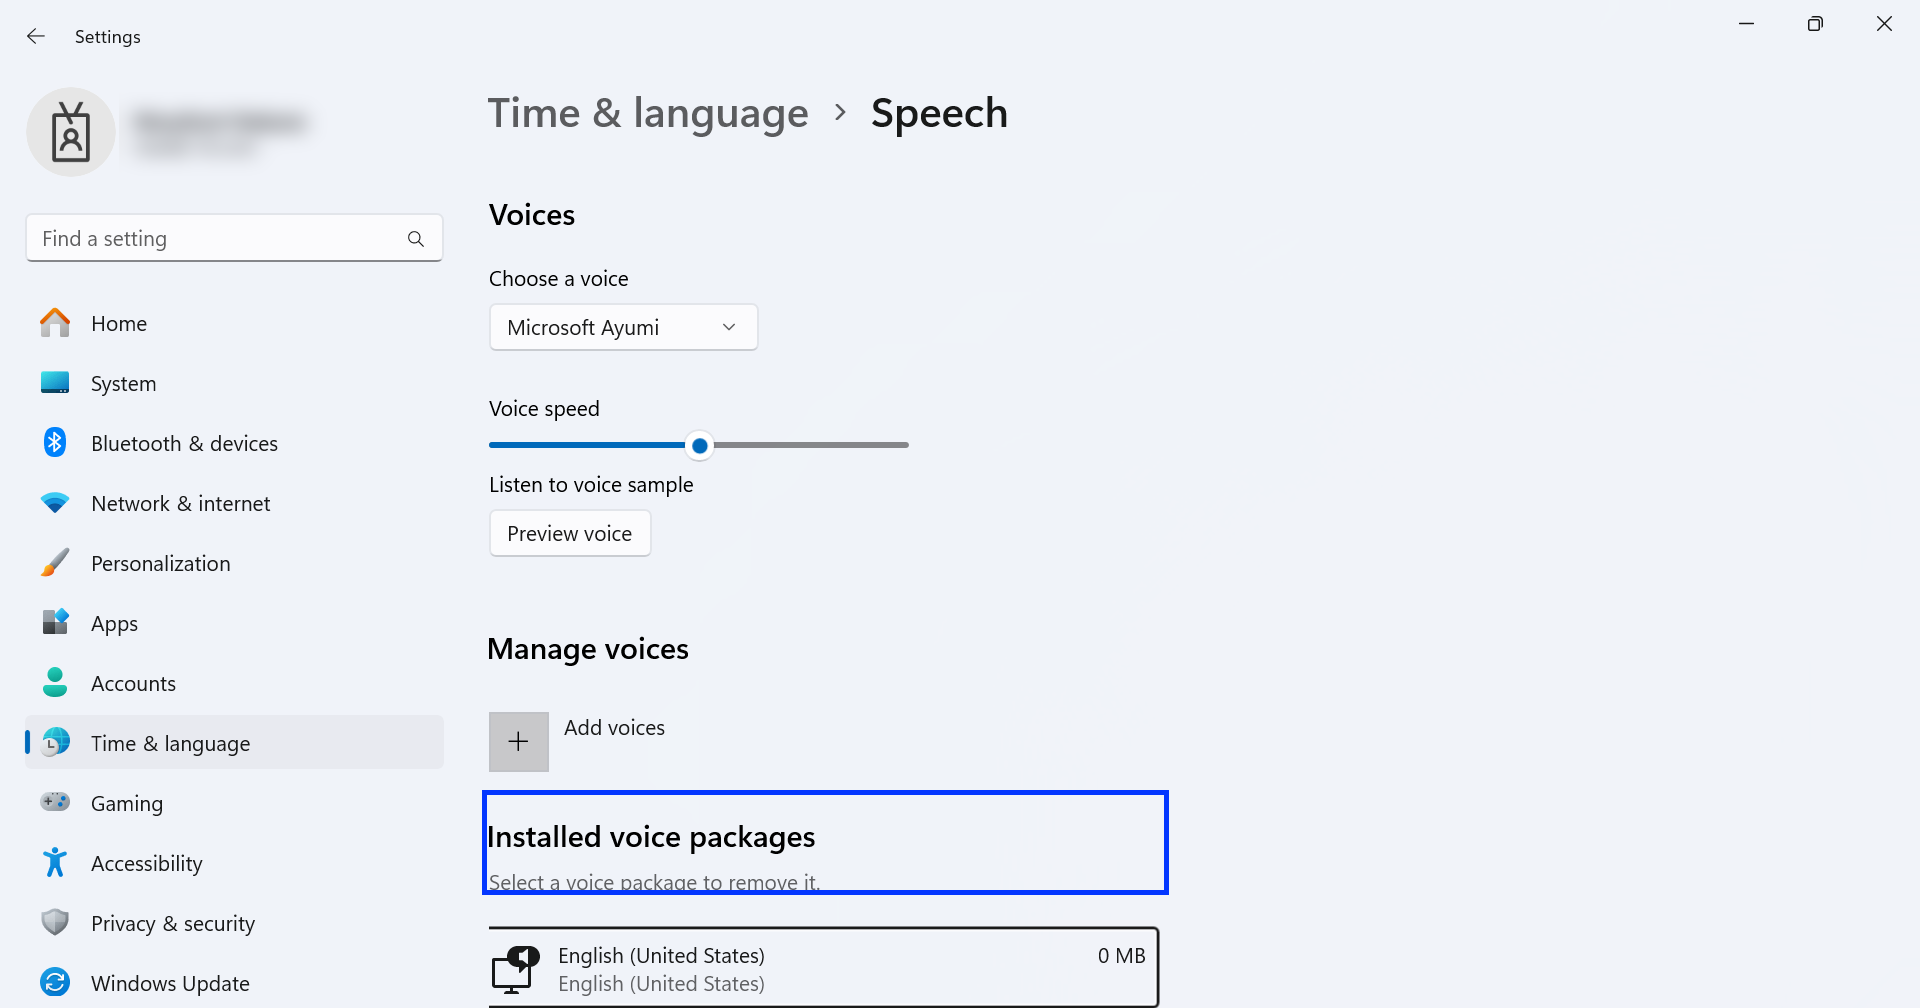
For general checks, having “English (United States),” and “Japanese” installed should make NVDA behave as intended. If checking sites in languages other than English and Japanese, it’s a good idea to add those languages as well.
Things You Should Know
Starting and Stopping NVDA
If a desktop shortcut was created during installation, NVDA can be launched either by clicking the desktop shortcut or by pressing Ctrl+Alt+N. If there is no shortcut, launch NVDA by typing nvda in the “Run” dialog (accessed by pressing Windows+R).
Exiting NVDA can be done by pressing NVDA+Q. If this key combination is not available for some reason, NVDA can also be exited via the previously mentioned NVDA menu.
Focus Mode and Browse Mode
- Reference Videos
NVDA has two operating modes: “Focus Mode” and “Browse Mode.”
The most significant difference between the two modes is that in Focus Mode, except for operations using the NVDA control key, all keyboard actions are passed directly to the OS or the application currently in focus. In contrast, in Browse Mode, keyboard actions are intercepted by NVDA and used to execute various NVDA functions.
While Focus Mode is the standard operating mode, Browse Mode is primarily available only when browsing the Web.
If Browse Mode is available, such as when the focus is on the content area of a Web browser, you can switch between the two modes by pressing NVDA+Space.
During Web browsing, it’s common to review content in Browse Mode and switch to Focus Mode for form inputs. However, for Web content that behaves more like an application, it may primarily be operated in Focus Mode.
Note: Many screen readers for Windows have similar modes of operation. In Microsoft Narrator, having “Scan Mode” on corresponds to Browse Mode, and off corresponds to Focus Mode. In JAWS, “Virtual PC Cursor” is analogous to Browse Mode, while “Forms Mode” corresponds to Focus Mode.
Utilizing the Speech Viewer
- Reference Video
The Speech Viewer is a feature of NVDA that displays the text of what NVDA vocalizes. It is useful when you cannot clearly hear the audio output or when you need to check what is being read aloud in situations where sound cannot be played.
The Speech Viewer can be accessed by opening the NVDA menu and selecting . Once executed, the Speech Viewer window will open, displaying the content spoken by NVDA.
When the Speech Viewer is no longer needed, close the Speech Viewer window. It can also be closed by reopening the NVDA menu and selecting again.
Key Commands to Know
Changing Speech Settings
You can temporarily change the speech settings without opening the settings screen. Use NVDA+Ctrl in combination with the arrow keys.
Pressing NVDA+Ctrl+← or NVDA+Ctrl+→ will read out the name of the setting being adjusted and its current value, like “Pitch 50.” Continue using one of these key combinations until the desired setting is announced. Once the setting you want to adjust is read out loud, use NVDA+Ctrl+↑ or NVDA+Ctrl+↓ to adjust the value for the setting.
Other Commands
- Reference Videos
- Ctrl
Stop reading.
- Shift
Pause/resume reading.
- NVDA+S
Change the reading mode (If the sound unexpectedly stops, pressing this a few times might be helpful in some cases).
- NVDA+1
Input Help (Press once to enter Help mode, and press again to exit Help mode. In Help mode, the names and roles of the keys pressed are read aloud.)
- NVDA+Q
Quit NVDA.
- NVDA+N
Show NVDA Menu.
Updating NVDA
NVDA is updated approximately every three months with a new release. In addition, minor version releases may occur between these major version releases.
NVDA is continuously improved, including updates for the latest browsers and Web technologies, so it’s important to always use the latest version.
By default, NVDA checks for updates upon startup. Additionally, you can explicitly check for updates by opening the NVDA menu and selecting .
Web Content Checks
Here, we explain the basic concepts and frequently performed operations when checking Web content. For specific methods of conducting checks based on specific checklist items, please refer to Examples of How to Conduct Checks Using NVDA.
When checking Web content, it’s fundamentally necessary to ensure that all information can be accessed in Browse Mode.
In Browse Mode, the basic operation is to read forward with the ↓ key and to read back with the ↑ key.
The length of movement forward/backward with the arrow keys is generally based on the HTML source’s elements.
For paragraphs without any links or parts marked up with span elements, a p element is treated as a single unit.
Conversely, if there are links, each link portion is treated as a unit, and if there are span elements, each part is treated as a unit, serving as the units of movement for the arrow keys.
If the text judged as a single unit exceeds a certain length, reading aloud will stop midway when pressing the ↓ key. In this case, pressing the ↓ key again will continue reading the next part.
Pressing NVDA+↑ allows you to reread the content that was just read aloud. (Precisely, this action makes NVDA read aloud the line where the cursor is currently located.)
The left and right arrow keys are used for reading aloud by character.
Having the Entire Page Read Aloud
You can have the entire page read aloud by following these steps:
Move to the beginning of the page with Ctrl+Home.
Start reading aloud with NVDA+↓.
If you want to stop the reading aloud partway through, press the Ctrl key.
Pressing NVDA+↓ again will allow you to continue having the rest read aloud.
Interactable Components
For components that accept some form of action, such as expandable menus and accordions, it’s necessary to verify that they can be operated even in Browse Mode.
Specifically, find the component in Browse Mode and try performing key operations on it. Ensure that operations with Enter, Space, and Esc keys result in the expected behavior in Browse Mode. If new content is displayed as a result of these operations, verify that this content can be read aloud in Browse Mode.
For key operations other than these, switch to Focus Mode by pressing NVDA+Space before checking.
Reading Tables
NVDA provides key commands to efficiently read tables. Using these commands makes it easier to understand the spatial relationships between cells in a table, making it important to ensure these commands function correctly during accessibility checks of tabulated content.
Below are the main key commands related to reading tables. These all work in Browse Mode.
Key Command |
Description |
|---|---|
T, Shift+T |
Move to the next or previous table |
Ctrl+Alt+↑ |
Move to and read the cell above |
Ctrl+Alt+↓ |
Move to and read the cell below |
Ctrl+Alt+← |
Move to and read the cell to the left |
Ctrl+Alt+→ |
Move to and read the cell to the right |
The following content is announced when moving among cells using the functions listed above.
move to left/right: the column header, column number, and the content of the destination cell
move up/down: the row header, row number, and the content of the destination cell
The following is announced if arrow keys are simply used in browse mode:
up/down arrows: move to the previous/next cell and announce the cell content; only a part of the cell might be read if there are line-breaks within the cell.
left/right arrows: move and announce character by character; the behavior on empty cells is as if there is only one space character