Caution
This document is an English translation of the “freee Accessibility Guidelines.” The normative version of this document is in Japanese, and the English version is informational. The English translation is incomplete, and any links with their link texts left in Japanese are untranslated. Please be aware that there may be inaccuracies in the translation or parts that are outdated.
How to Perform Checks With macOS VoiceOver
This document outlines the recommended settings for VoiceOver, the screen reader for macOS, its basic usage, and how to perform basic checks.
It is important to note that iOS also includes a screen reader named VoiceOver [1], but the VoiceOver on macOS is entirely different. This article focuses solely on macOS VoiceOver, and any mention of “VoiceOver” refers to macOS VoiceOver.
When explaining key operations in this document, notations like VO+→ are used, which means pressing the “VoiceOver key” along with →, as explained in VoiceOver Key (VO Key) and VO Key Lock. Also, F1 to F12 refer to the function keys at the top of the keyboard, which may require pressing the fn key simultaneously depending on your settings. (Refer to Function Key Settings)
The Role of macOS VoiceOver in Accessibility Checks
As stated in How to Perform Checks With NVDA, freee standardizes on the latest versions of NVDA on Windows and Google Chrome for necessary screen reader checks. This is because the majority of screen reader users in Japan use Windows [2], and ensuring accessibility for these users is deemed crucial.
However, not all checks need to be conducted with NVDA; some can also be performed with macOS VoiceOver. While NVDA is recommended for final checks, macOS VoiceOver can be used without issues for checks during development, especially in the following cases:
Verifying the behavior of existing components that have been confirmed to have no issues with NVDA.
Checking the behavior of parts implemented with static HTML.
For new components, it’s highly recommended to conduct checks with NVDA from an early stage in development.
There may be instances where something works without issues on macOS VoiceOver but has problems on NVDA, or vice versa. The ideal is to achieve functionality that works flawlessly in both environments, but at freee, the minimum goal is to ensure it works correctly with NVDA.
Preparation
Starting and Stopping VoiceOver
VoiceOver can be started or stopped using any of the following methods:
Press Command+F5.
Quickly press the Touch ID three times while pressing the Command key.
Ask Siri to “turn on VoiceOver” (to start) or “turn off VoiceOver” (to stop).
Methods 1 and 2 will start VoiceOver if it’s not already running and stop it if it is.
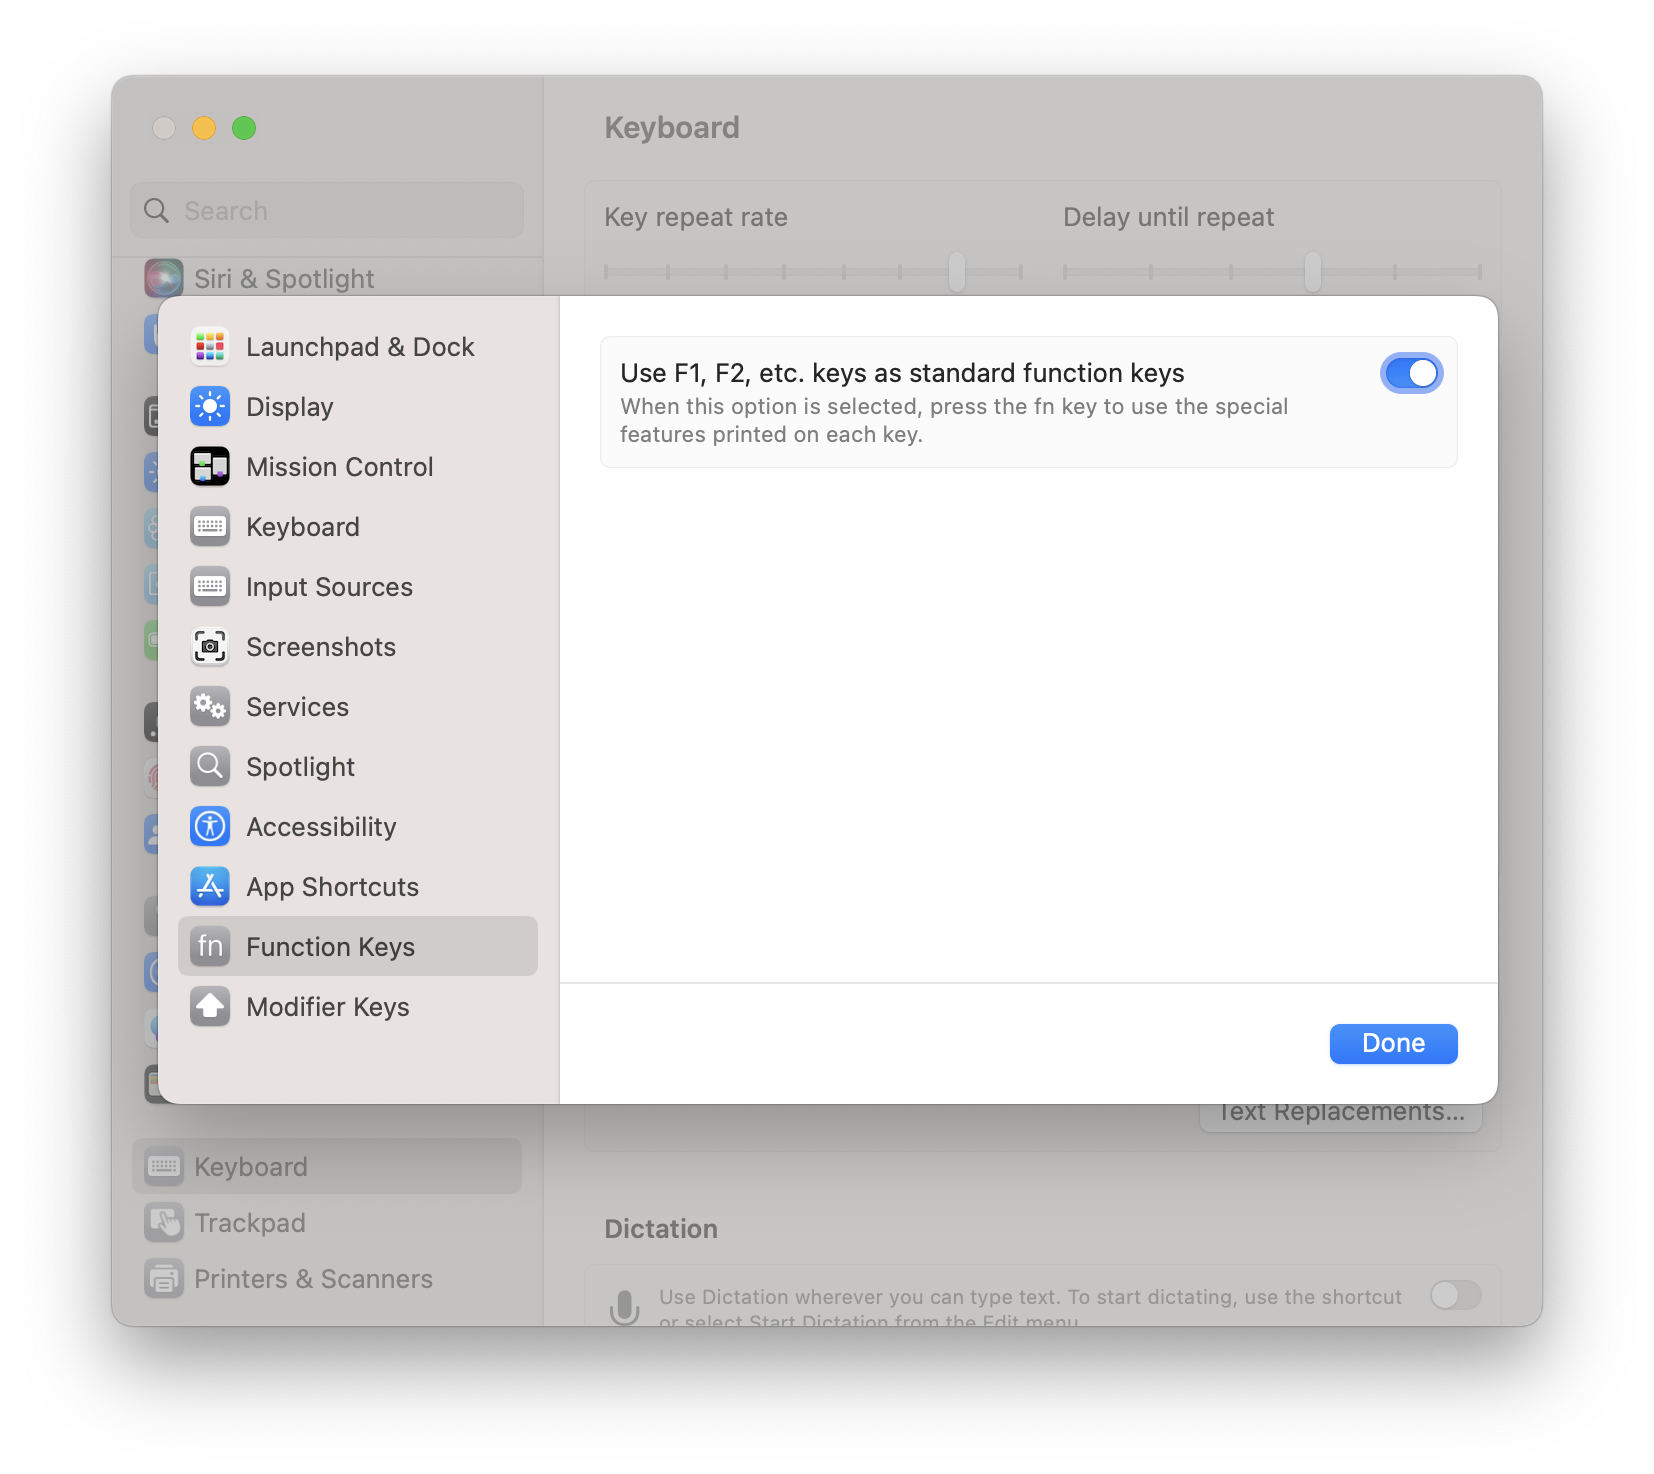
Function Key Settings
As mentioned, the Command+F5 key may require the addition of the fn key depending on your settings. If you frequently use function keys, consider configuring them to not require pressing the fn key.
Here are the steps for setting up in macOS Ventura:
Select .
Choose “Keyboard” from the sidebar.
Click on “Keyboard Shortcuts” on the right side.
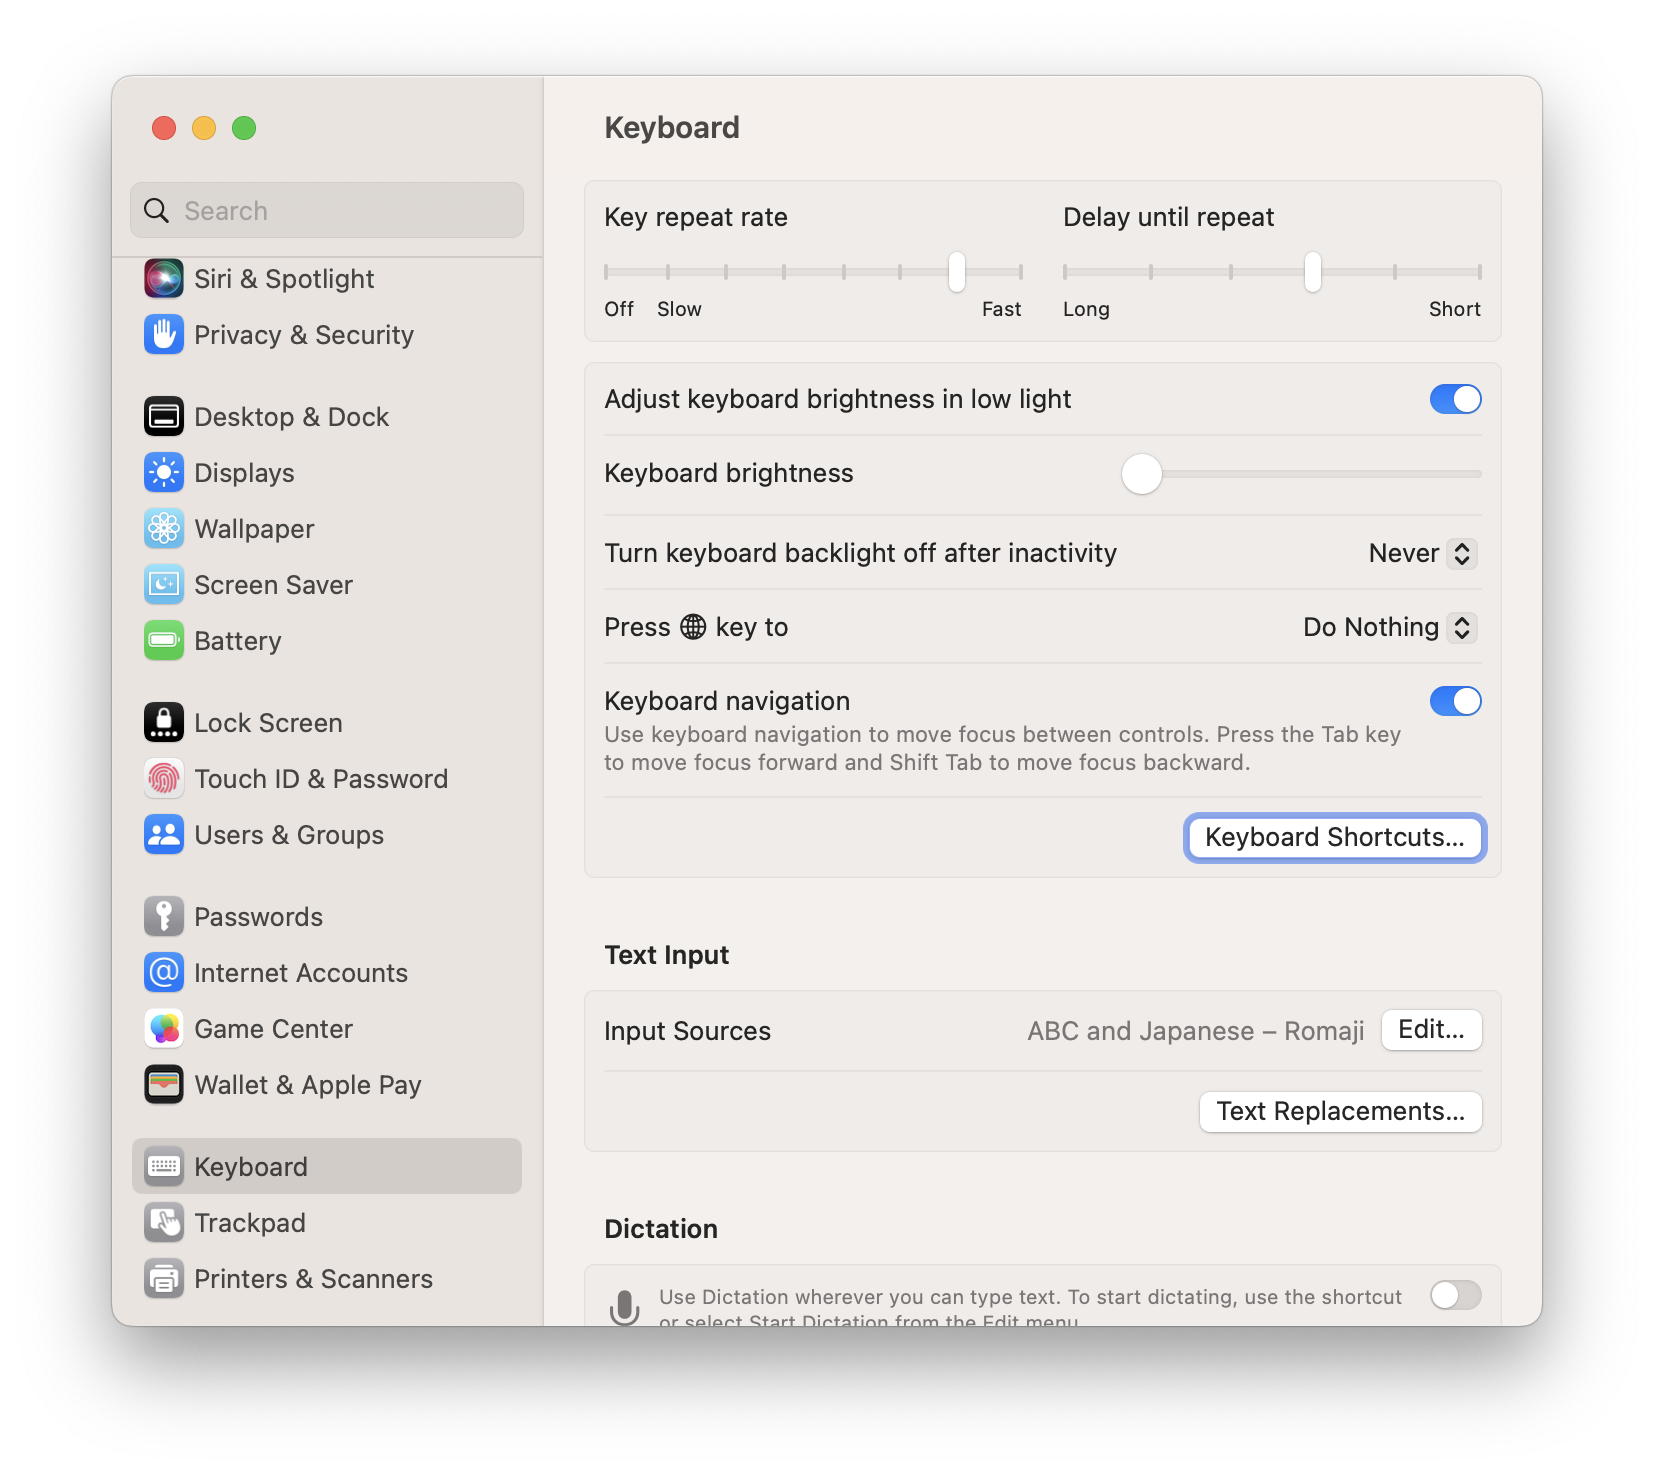
Select “Function Keys” from the sidebar.
On the right, turn on “Use F1, F2, etc., keys as standard function keys.”
CF: How to use the function keys on your Mac - Apple Support
Operation for First-time VoiceOver Users
When VoiceOver is started for the first time, a “Welcome Dialog” will appear, and a voice will read the content on the screen.
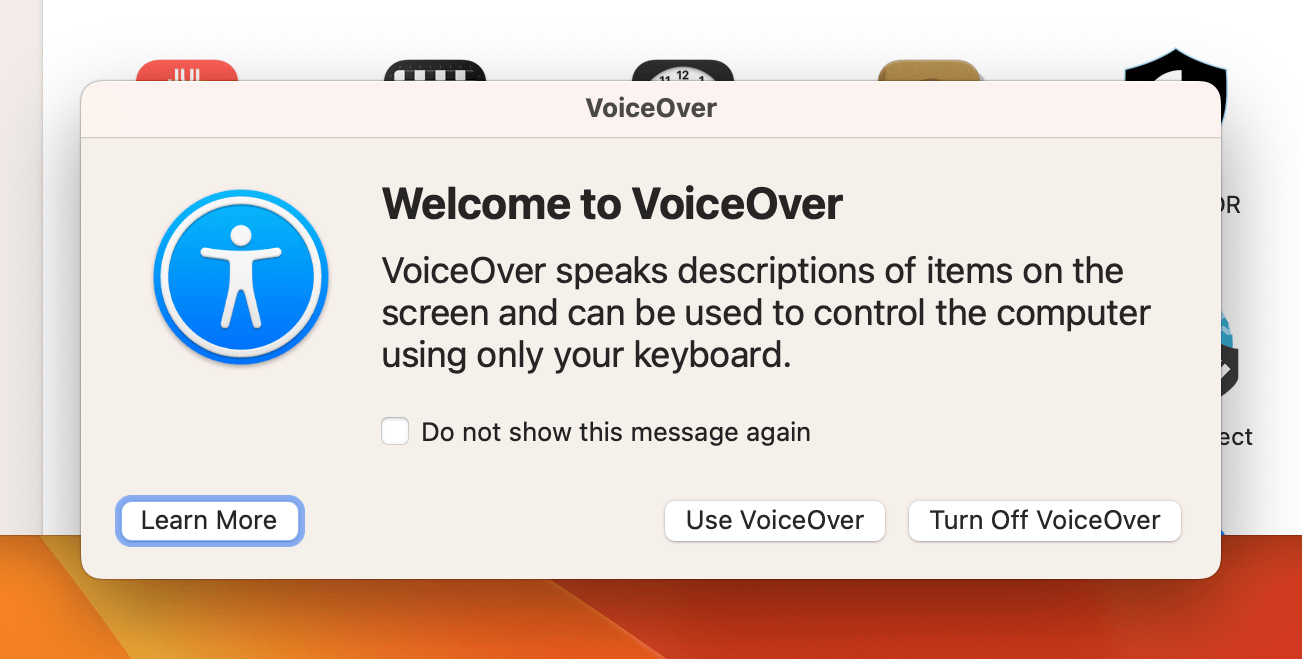
From this dialog, you can access the VoiceOver Quick Start, but at this point, you should close this screen by pressing the V key. The VoiceOver Quick Start is provided to help visually impaired users learn how to use VoiceOver on their own. It can be launched anytime while VoiceOver is running by pressing VO+Command+F8. It’s useful for gaining a deeper understanding of how to operate VoiceOver.
Recommended Settings
Pressing VO+F8 while VoiceOver is running launches the VoiceOver Utility, where various VoiceOver settings can be changed. This interface displays settings categories on the left and the settings options for the currently selected category on the right.
In this section, we outline the recommended settings for performing accessibility checks, organized by category.
General
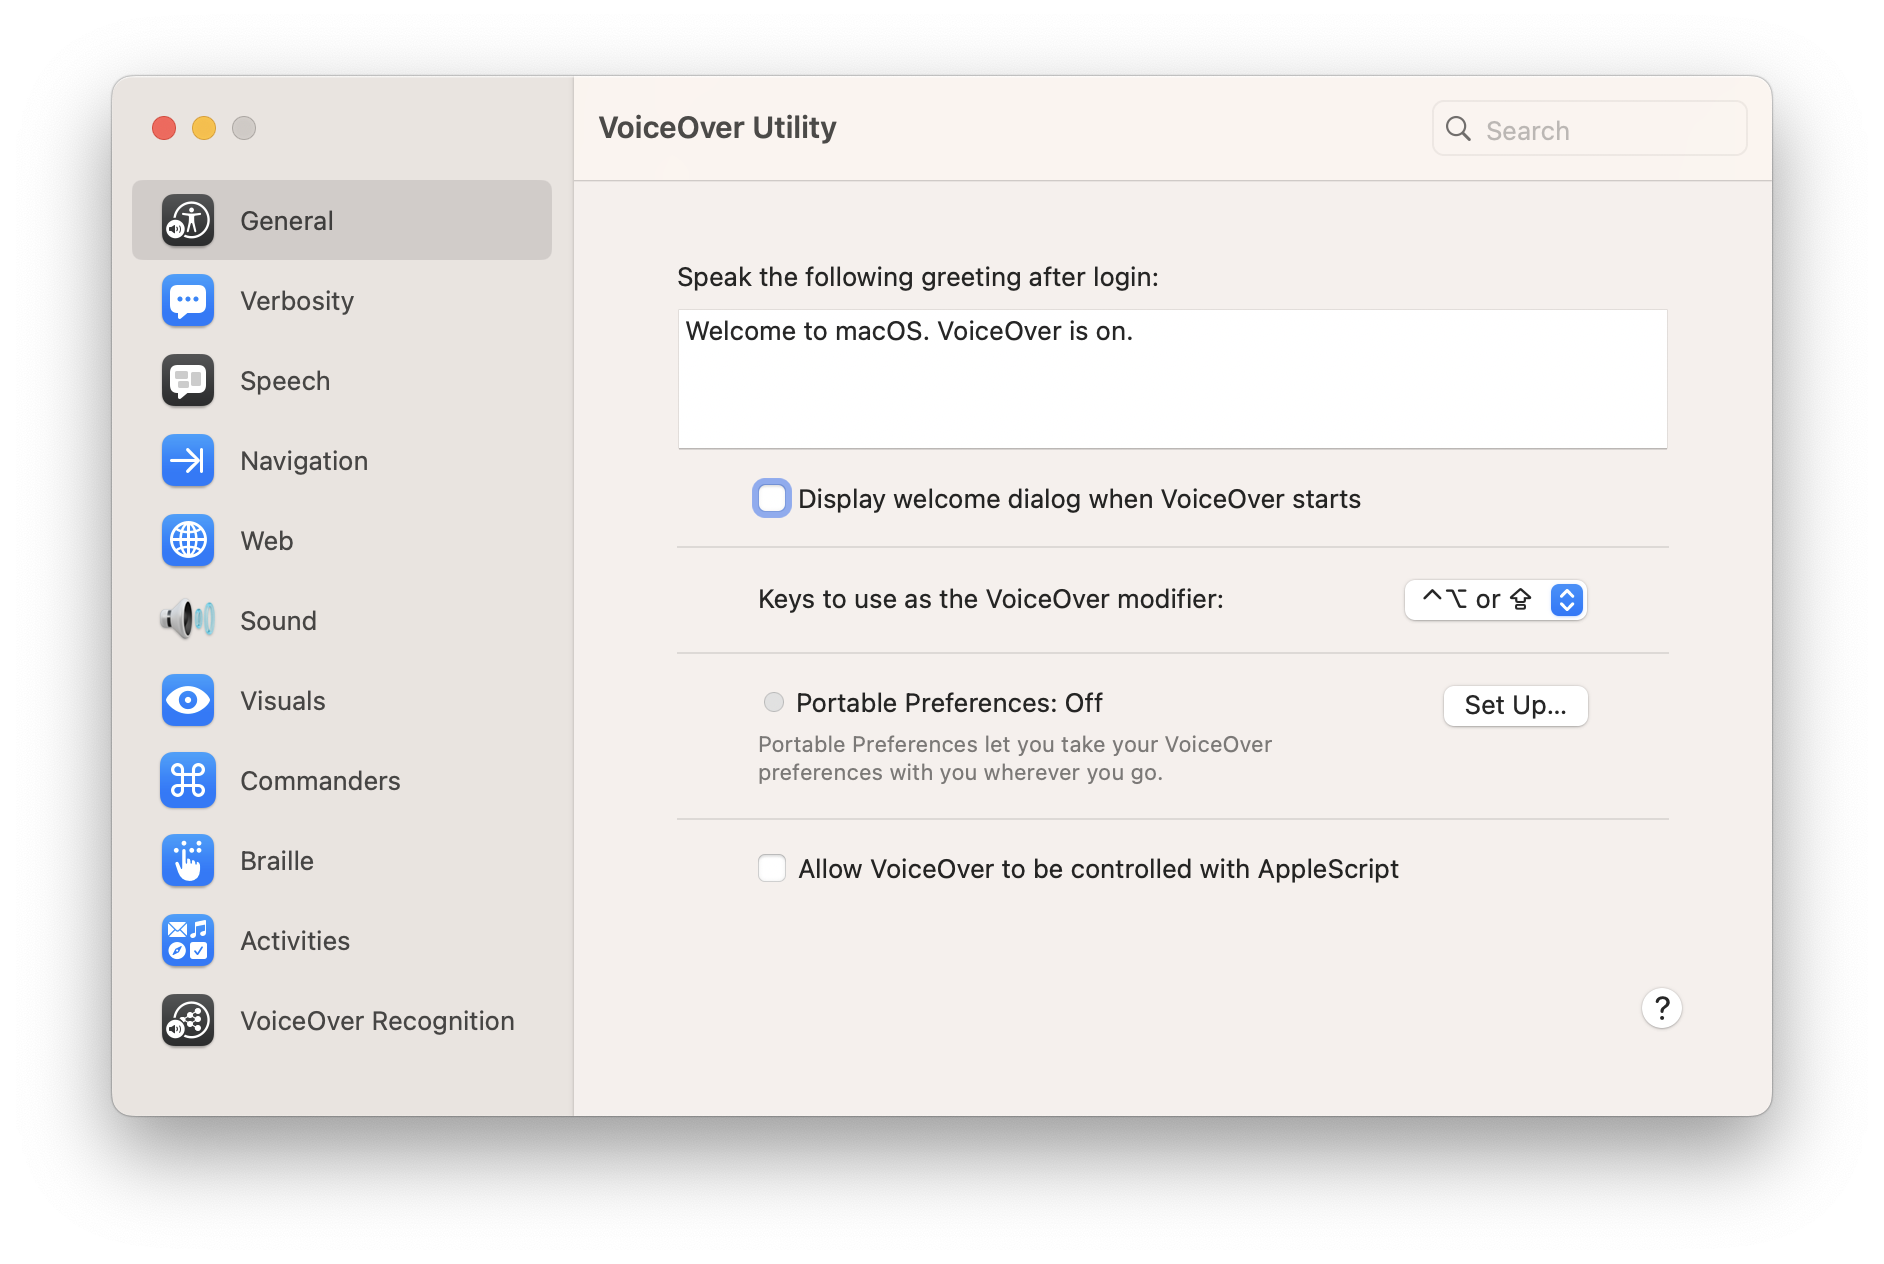
Uncheck “Show Welcome Dialog at VoiceOver Startup.” This prevents the welcome dialog mentioned earlier from being displayed.
Visuals
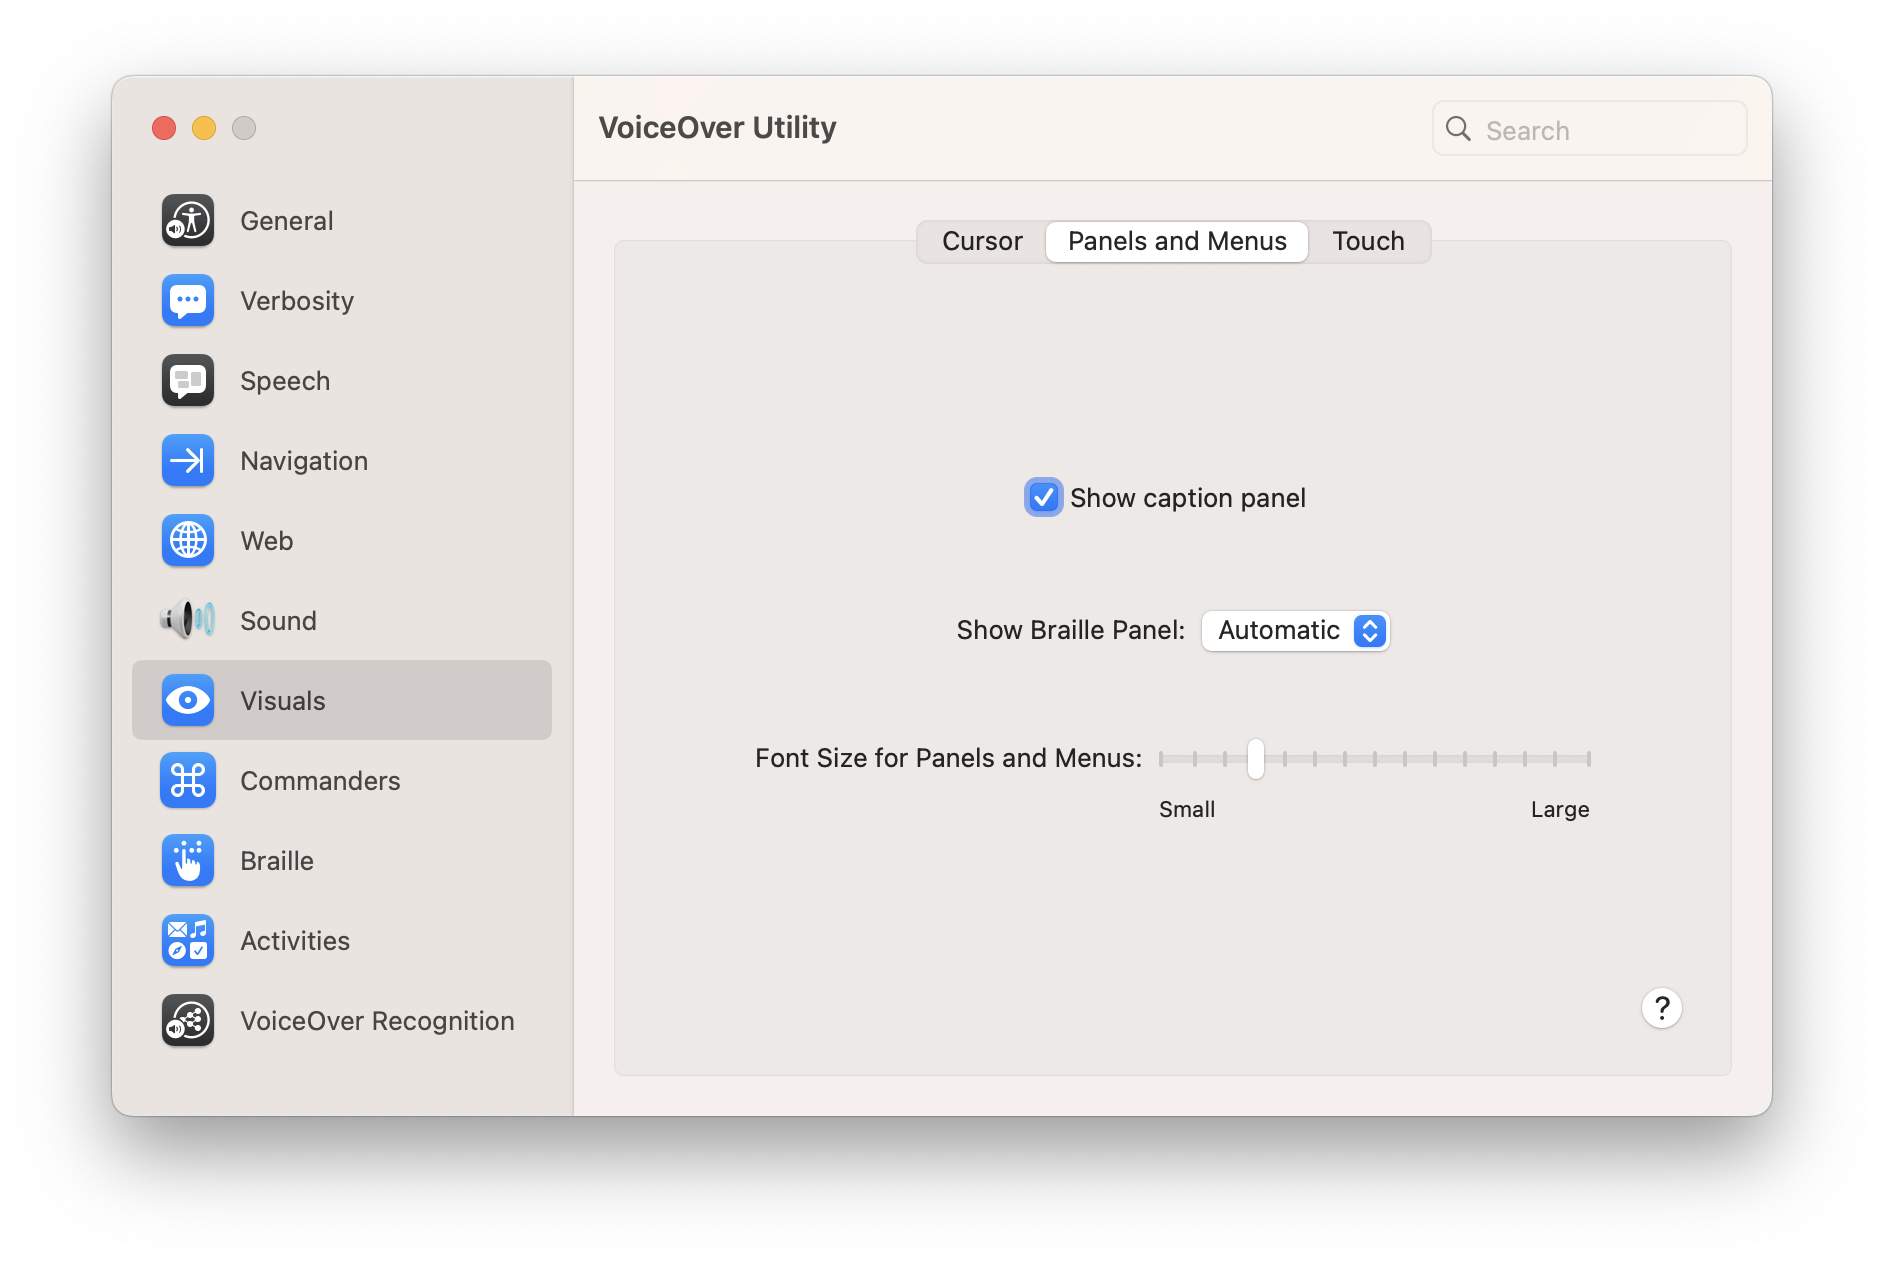
In the “Panels and Menus” tab, enable “Show Caption Panel.” This allows the content VoiceOver is reading to be displayed on the screen.
Commanders
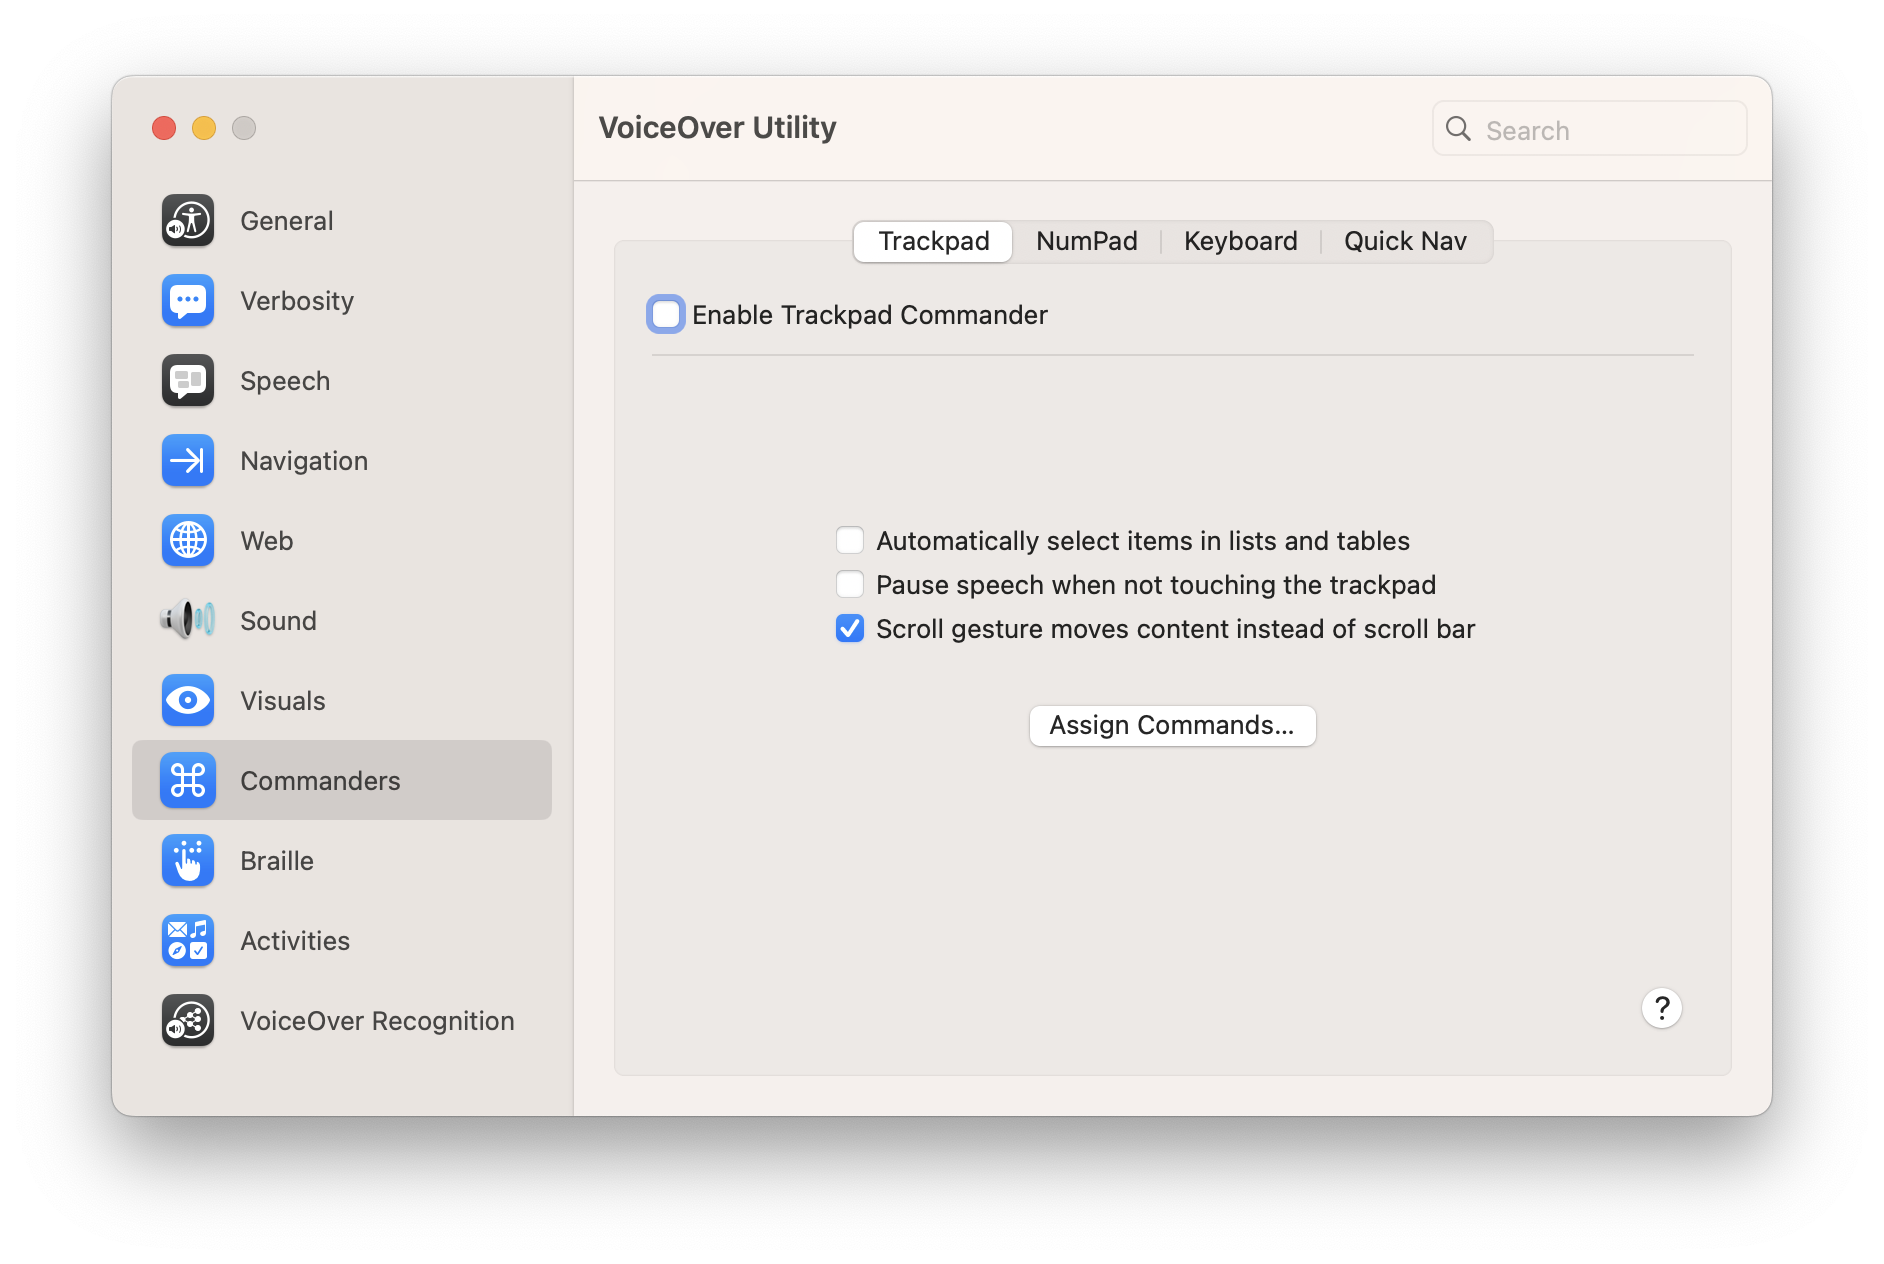
In the “Trackpad Commander” tab, uncheck “Enable Trackpad Commander.” If enabled, the trackpad can be used for VoiceOver commands, which prevents normal mouse operations.
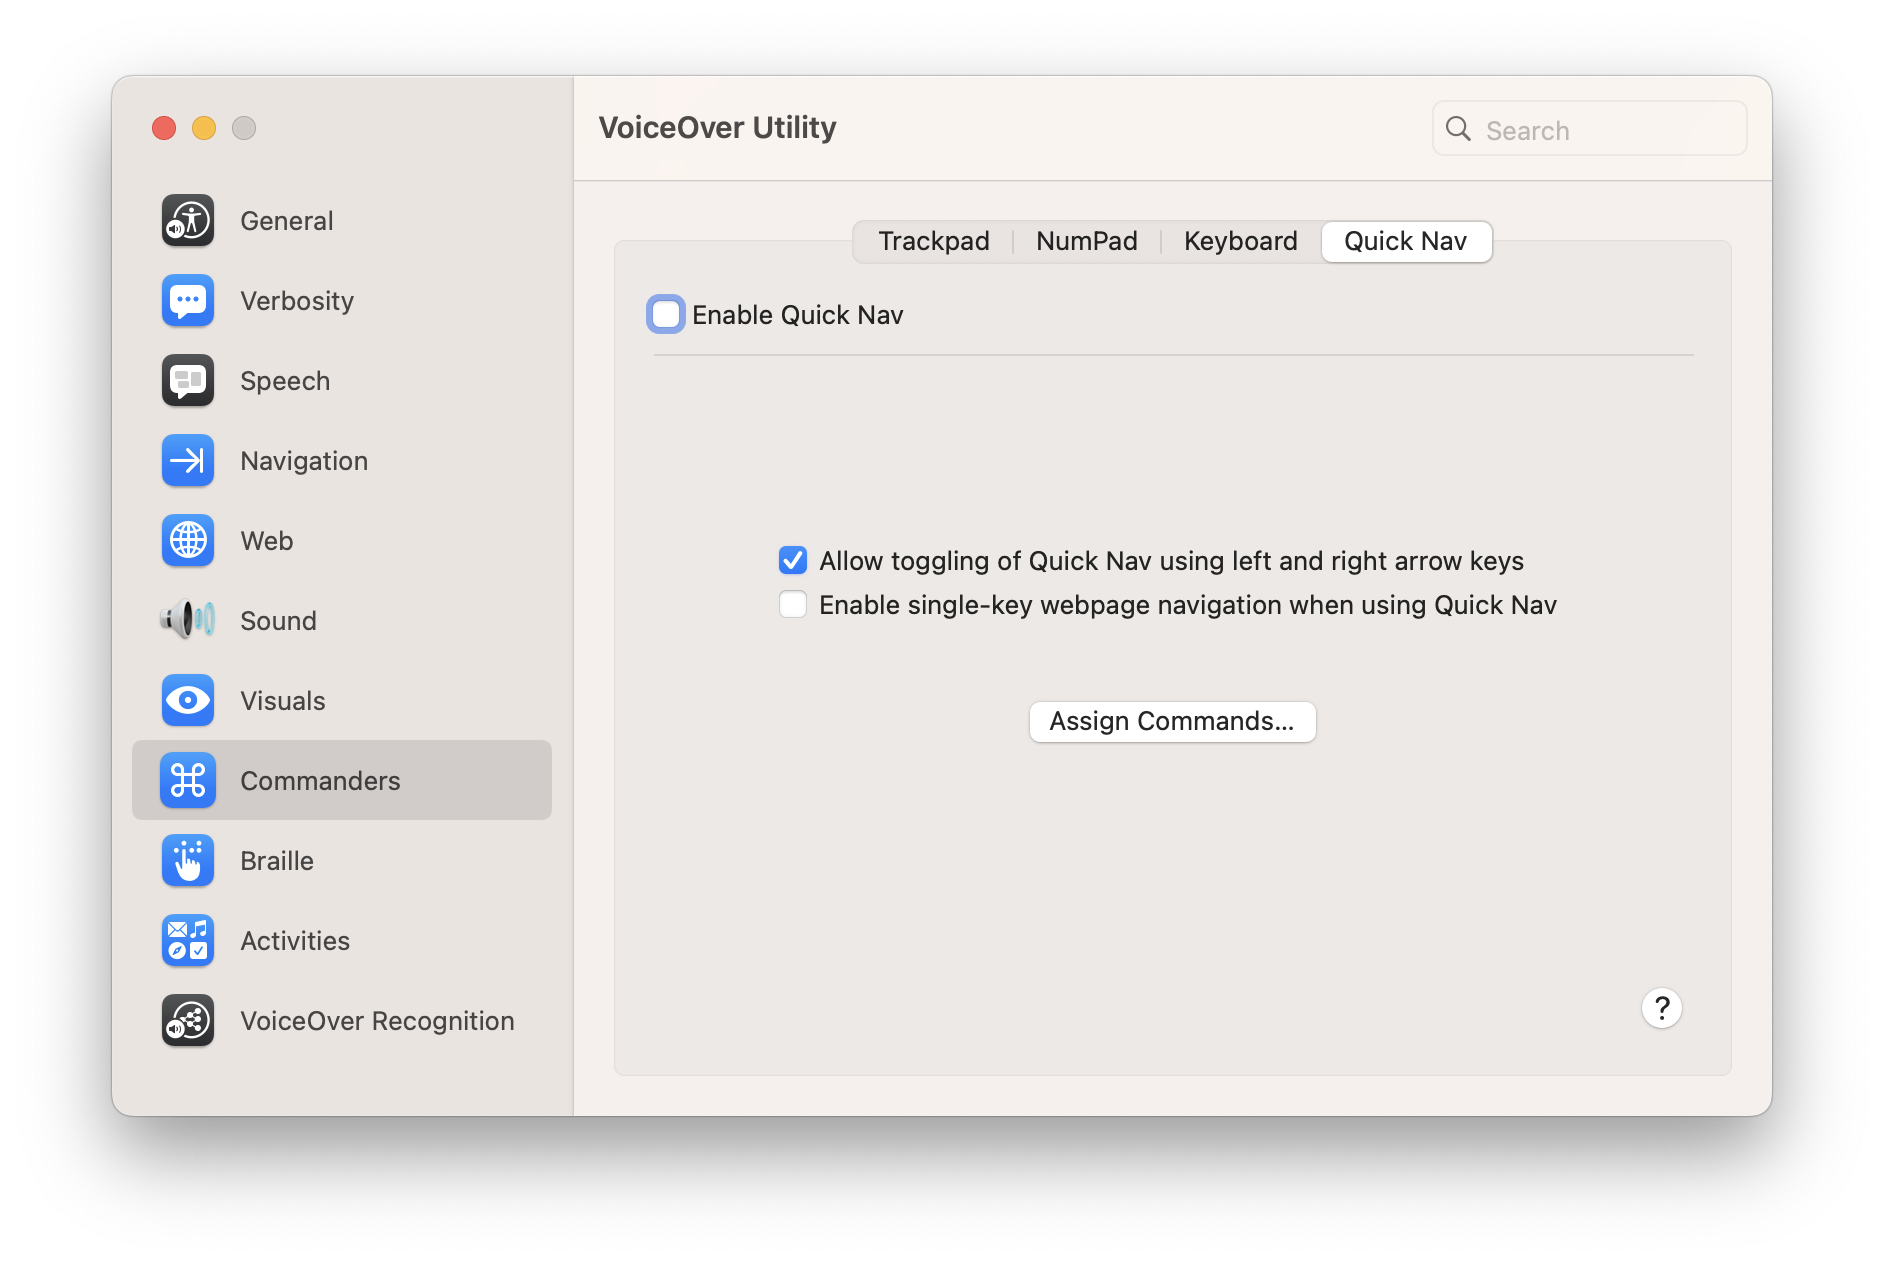
In the “Quick Nav” tab, uncheck “Enable Quick Nav.” When enabled, this setting allows for operations without the VO key, which might be convenient for regular VoiceOver users. However, for conducting accessibility checks with VoiceOver, enabling this mode by mistake could lead to confusion, so we recommend keeping this setting disabled.
Things You Should Know
VoiceOver Key (VO Key) and VO Key Lock
With VoiceOver activated, pressing certain keys in combination with others enables VoiceOver functions. This combination is known as the “VoiceOver Key (VO Key).” The default settings designate both the Control+Option combination and the Caps Lock key as the VoiceOver Key.
Pressing VO+; locks the VO key, allowing you to perform various VoiceOver key commands without continuously pressing the VO key. However, this changes the behavior of all key commands, so caution is needed. For example, in this state, pressing Command+F5 is interpreted as pressing VO+Command+F5, and VoiceOver will not exit.
If key commands do not behave as expected, it’s possible the VO key is locked. In such cases, press VO+; again to unlock.
VoiceOver Cursor and Keyboard Focus
When VoiceOver is enabled, a distinctive rectangle known as the VoiceOver cursor appears on the screen. As the VoiceOver cursor moves, it reads aloud the items it encounters, making them the target for operations.
By default, the VoiceOver cursor and keyboard focus or cursor are synchronized, typically residing in the same location. However, they are actually independent, and their positions might not always match.
Similarly, the VoiceOver cursor and mouse pointer are independent entities. While the default settings allow them to move independently, this behavior can be changed in the settings.
Moving the VoiceOver Cursor
The VoiceOver cursor can be moved by pressing the VO key in conjunction with the arrow keys. Typically, moving to the right with VO+→ progresses through the screen content, while moving to the left with VO+← allows for revisiting previous content.
As mentioned, the location of the VoiceOver cursor determines what is targeted for operations. For instance, if the VoiceOver cursor is on a link, pressing VO+Space achieves the same result as clicking that link. If the VoiceOver cursor is over an operable item, detailed instructions on how to operate it will be read aloud after a short pause.
Pressing the arrow keys without the VO key moves the cursor as it would without VoiceOver activated, shifting the keyboard focus accordingly. Depending on the settings, the VoiceOver cursor may or may not follow the cursor.
Operating Items
When moving the VoiceOver cursor over text content with VO+→ and VO+←, navigation occurs in units of sentences or similarly coherent chunks of text. However, the unit of movement might sometimes be larger, such as the elements of a window’s layout.
For example, when the VoiceOver cursor is on the Google Chrome toolbar and moves rightward to the content of a displayed page, it might announce “Web content” upon reaching the page content. This happens because VoiceOver interprets the section displaying the page as a single element.
In such cases, it’s necessary to “enter” the element with the VoiceOver cursor to explore its interior. The key command for this action is VO+Shift+↓.
In the example of Google Chrome mentioned above, pressing VO+Shift+↓ when “Web content” is announced allows the VoiceOver cursor to enter the part of the page displaying content. In this state, using VO+→ and VO+← enables page content review. Additionally, elements like tables or lists within the page may be interpreted as single elements. In such cases, using VO+Shift+↓ allows you to enter these elements with the VoiceOver cursor for further exploration. To exit the current element and move the VoiceOver cursor outside, use VO+Shift+↑.
Rotor
Pressing VO+U while VoiceOver is active displays a menu known as the rotor. This menu shows a list of elements within the window that is currently focused. For instance, if a Web page displayed in Google Chrome is focused when the rotor menu is opened, items such as links, headings, form controls, tables, and landmarks will be shown, depending on what is contained on the page.
You can switch which item’s list is displayed using the left and right arrow keys. Once you’ve selected the item whose list you want to view, you can navigate within that list using the up and down arrow keys. Pressing the Enter key on an item within the list will move the focus to that item.
Key Commands to Know
- VO+A
Read from where the VoiceOver cursor is located.
- VO+Shift+F4
Moves the VoiceOver cursor to the current keyboard focus.
- VO+Command+F4
Moves the keyboard focus to the current VoiceOver cursor position.
- VO+Shift+F5
Moves the VoiceOver cursor to the mouse pointer’s location.
- Ctrl
Pauses VoiceOver speech, pressing again resumes speech.
- VO+K
Keyboard Help (Press once to enter help mode, press again to exit. In help mode, the name and function of the pressed key are read aloud.)
Reference Information
The information provided here is only a small part of what VoiceOver can do. For more detailed information on how to use VoiceOver and its features, refer to the following:
This guide can also be accessed from the help menu which appears when VO+H is pressed.
Web Content Checks
Here, we explain the basic concepts and frequently performed operations when conducting checks on Web content.
When checking Web content, it is essential to ensure that all information is accessible via the VoiceOver cursor. The basic operations involve navigating forward with VO+→ and moving backward with VO+←.
The size of a unit advanced or reversed with these key commands is generally by paragraph. In cases where the text includes links, the linked portion is treated as a single unit. Additionally, the unit of advancement when reading can vary depending on the HTML elements used. If the reading stops midway through the text when navigating forward with VO+→, it is not a problem as long as pressing VO+→ again continues the reading from where it left off.
Pressing VO+F3 allows you to have the content that was just read aloud repeated. (To be precise, this command is to describe the item where the VoiceOver cursor is currently located.)
Making VoiceOver Read Longer text
Pressing VO+A allows you to have VoiceOver read aloud the content from the current position of the VoiceOver cursor onwards.
Depending on the settings, the VoiceOver cursor may automatically move to the position of the mouse pointer. If not set up this way, pressing VO+Shift+F5 moves the VoiceOver cursor to the location of the mouse pointer. By using this method, and navigating the VoiceOver cursor to the desired location with VO+→ or VO+←, then pressing VO+A, you can verify the reading of specific sections.
Additionally, pressing VO+Shift+Home (or VO+Shift+fn+← on a laptop) moves the VoiceOver cursor to the beginning of the page. Combining this action with VO+A allows for the entire page to be read aloud.
To stop the reading midway, press the Ctrl key. If you press Ctrl to pause the reading and then do not perform any other action, pressing Ctrl again will resume the reading. Alternatively, pressing VO+A again can also continue the reading from where it was paused.
Interactable Components
For components that accept some form of interaction, such as expandable menus or accordions, it is necessary to ensure they can be operated with a keyboard.
Specifically, move the VoiceOver cursor and keyboard focus onto the component and attempt to execute key operations on it.
By default, the VoiceOver cursor and keyboard focus are synchronized, but if they are not set up this way, use one of the following actions to move the VoiceOver cursor and keyboard focus onto the desired component:
Move the keyboard focus onto the component, then press VO+Shift+F4.
Move the VoiceOver cursor onto the component, then press VO+Command+F4.
When performing key operations, press keys such as the arrow keys, Enter, Space, and Esc without combining them with the VO key to check their behavior. If new content is displayed as a result, verify that this content can be read with the VoiceOver cursor.